Kettler Data Interface
With the whole pandemic, I decided to do something for my cardiovascular system. So I started to look for an exercise bike. After a short search on the used market, I found one. A Kettler (Good german quality work) FX1 bike. When I saw that it has an “interface”, I immediately contacted the seller. With a bit of googling around found out what this “interface actually is. I came upon a Blogpost from 2013 where somebody documented a bit about it. With the Interface it is possible to get information out of it but also to set various settings like target Power or distance. Kettler uses this with their “Kettler World Tours” Software, which allows you to “drive around the world” simulated.
My Plan was to use this to extract the Data and Store it in my Openhab2 InfluxDB with Grafana to visualize it. Because I love collecting Data :)
So, what’s the plan?
Extract the Data and send it via MQTT to my OpenHab which will then put everything into the InfluxDB to view the values in a Grafana Dashboard.
But How?
I used a Nodemcu, an MAX3232 RS232 Shield and one of those cheap LM2596 DC-DC Converters. Everything is nicely Hotglued in the Display mount on the Exercise bike. The DC-DC Converter gets its power from the Kettler Display unit. It is powered with 19V which is then converted down to about 7V which is then fed into the Nodemcu.
From the Blogpost I knew that I only need to spam “ST\r\n” and the bike will answer with all the metrics it currently has.
It does not need any arguments and its output consists of 8 fields separated by tab-characters, where each fields means [pulse in Hz][rpm][speed in 0.1 km/h ][distance in 0.1 km][requested power][energy in kJ][time in minutes:seconds][actual power (?)]
st -> 000\t000\t000\t000\t025\t0000\t00:00\t000
The Code
In the beginning, I used an Arduino Mega to use Serial1 with the Kettler and Serial0 to report everything to my laptop for debugging and testing. When everything was fine, I switched to the Nodemcu and added the rest.
The Code is Based around the PubSubClient Arduino Library example sketches by Nick O’Leary.
#include <ESP8266WiFi.h>
#include <PubSubClient.h>

#define wifi_ssid "*****"
#define wifi_password "*********"
#define mqtt_server "MQTT_SERVER_IP"
#define mqtt_user "USERNAME"
#define mqtt_password "PASSWORD"
#define Datentopic "sensor/Fahrrad"

WiFiClient espClient;
PubSubClient client(espClient);
char Inhalt[35] = "";
int n = 0;
int eins = 0;
int zwei = 0;
int drei = 0;
int vier = 0;
int Puls = 0;
int Drehzahl = 0;
int Geschwindigkeit = 0;
int Distanz = 0;
int Sollpower = 0;
int kilojoule = 0;
int IstPower = 0;
bool newData = false;
bool first = true;

void setup() {
  Serial.begin(9600);
  setup_wifi();
  client.setServer(mqtt_server, 1883);
  delay(3000);
  first = true;
  //Array initialisieren
  for (int n = 0; n <= 35; n++) {
    Inhalt[n] = '0';
  }
  //beim ersten mal kommt rubbish raus
  Serial.write("ST\r\n");   // read it and send it out Serial1 (pins 0 & 1)
  //wenn serial da ist, erstmal leeren
  while (Serial.available()) {     // If anything comes in Serial1 (pins 0 & 1)
    char muell = Serial.read();
  }
}

void setup_wifi() {
  delay(10);
  WiFi.begin(wifi_ssid, wifi_password);
  while (WiFi.status() != WL_CONNECTED) {
    delay(500);
  }
}

void reconnect() {
  // Loop until we're reconnected
  while (!client.connected()) {
    // Attempt to connect
    // If you do not want to use a username and password, change next line to
    // if (client.connect("ESP8266Client")) {
    if (client.connect("ESP8266Client", mqtt_user, mqtt_password)) {
    } else {
      delay(5000);
    }
  }
}
void Kettler() {
  Serial.write("ST\r\n");   // read it and send it out Serial1 (pins 0 & 1)
  n = 0;
  while (Serial.available()) {     // If anything comes in Serial1 (pins 0 & 1)
    Inhalt[n] = Serial.read();
    //Serial.write(Inhalt[n]);   // read it and send it out Serial (USB)
    n++;
    newData = true;
  }
  if (newData == true) {
    //Puls
    eins = Inhalt[0] - '0';
    zwei = Inhalt[1] - '0';
    drei = Inhalt[2] - '0';
    Puls = 100 * eins + 10 * zwei + drei;

    //rpm
    eins = Inhalt[4] - '0';
    zwei = Inhalt[5] - '0';
    drei = Inhalt[6] - '0';
    Drehzahl = 100 * eins + 10 * zwei + drei;

    //Geschwindigkeit
    eins = Inhalt[8] - '0';
    zwei = Inhalt[9] - '0';
    drei = Inhalt[10] - '0';
    Geschwindigkeit = 10 * eins + 1 * zwei + drei * 0.1;

    //Distanz
    eins = Inhalt[12] - '0';
    zwei = Inhalt[13] - '0';
    drei = Inhalt[14] - '0';
    Distanz = 10 * eins + 1 * zwei + drei * 0.1;

    //Sollpower
    eins = Inhalt[16] - '0';
    zwei = Inhalt[17] - '0';
    drei = Inhalt[18] - '0';
    Sollpower = 100 * eins + 10 * zwei + drei;

    //Kilojoule
    eins = Inhalt[20] - '0';
    zwei = Inhalt[21] - '0';
    drei = Inhalt[22] - '0';
    vier = Inhalt[23] - '0';
    kilojoule = 1000 * eins + 100 * zwei + 10 * drei + vier;

    //IstPower
    eins = Inhalt[31] - '0';
    zwei = Inhalt[32] - '0';
    drei = Inhalt[33] - '0';
    IstPower = 100 * eins + 10 * zwei + drei;

    newData = false;
  }
}
void loop() {
  if (!client.connected()) {
    reconnect();
  }
  client.loop();
  Kettler();
  if (first == false) {
    client.publish("sensor/Fahrrad/Puls", String(Puls).c_str(), true);
    client.publish("sensor/Fahrrad/Drehzahl", String(Drehzahl).c_str(), true);
    client.publish("sensor/Fahrrad/Geschwindigkeit", String(Geschwindigkeit).c_str(), true);
    client.publish("sensor/Fahrrad/Distanz", String(Distanz).c_str(), true);
    client.publish("sensor/Fahrrad/Sollpower", String(Sollpower).c_str(), true);
    client.publish("sensor/Fahrrad/kilojoule", String(kilojoule).c_str(), true);
    client.publish("sensor/Fahrrad/IstPower", String(IstPower).c_str(), true);
  }
  first = false;
  delay(10000);
(Yes I know. The Number-conversion is bad)
When I finally got all my values in Openhab, I went for a ride to test everything.
The Kettler has a Dongle for wireless Heartrate communication to a Cheststrap. While my stuff was not powered, everything worked fine, but as soon as everything was powered, the HR Communication didn’t work anymore. After a bit of googling, I found out that these dongles work with a 5kHz transmission frequency. Just under the connector I mounted the LM2596 which operates with an 150kHz Frequency. This was probably distorting the signal for the receiver. After moving the DC-DC Converter to the top of the enclosure, everything was fine.
The Result
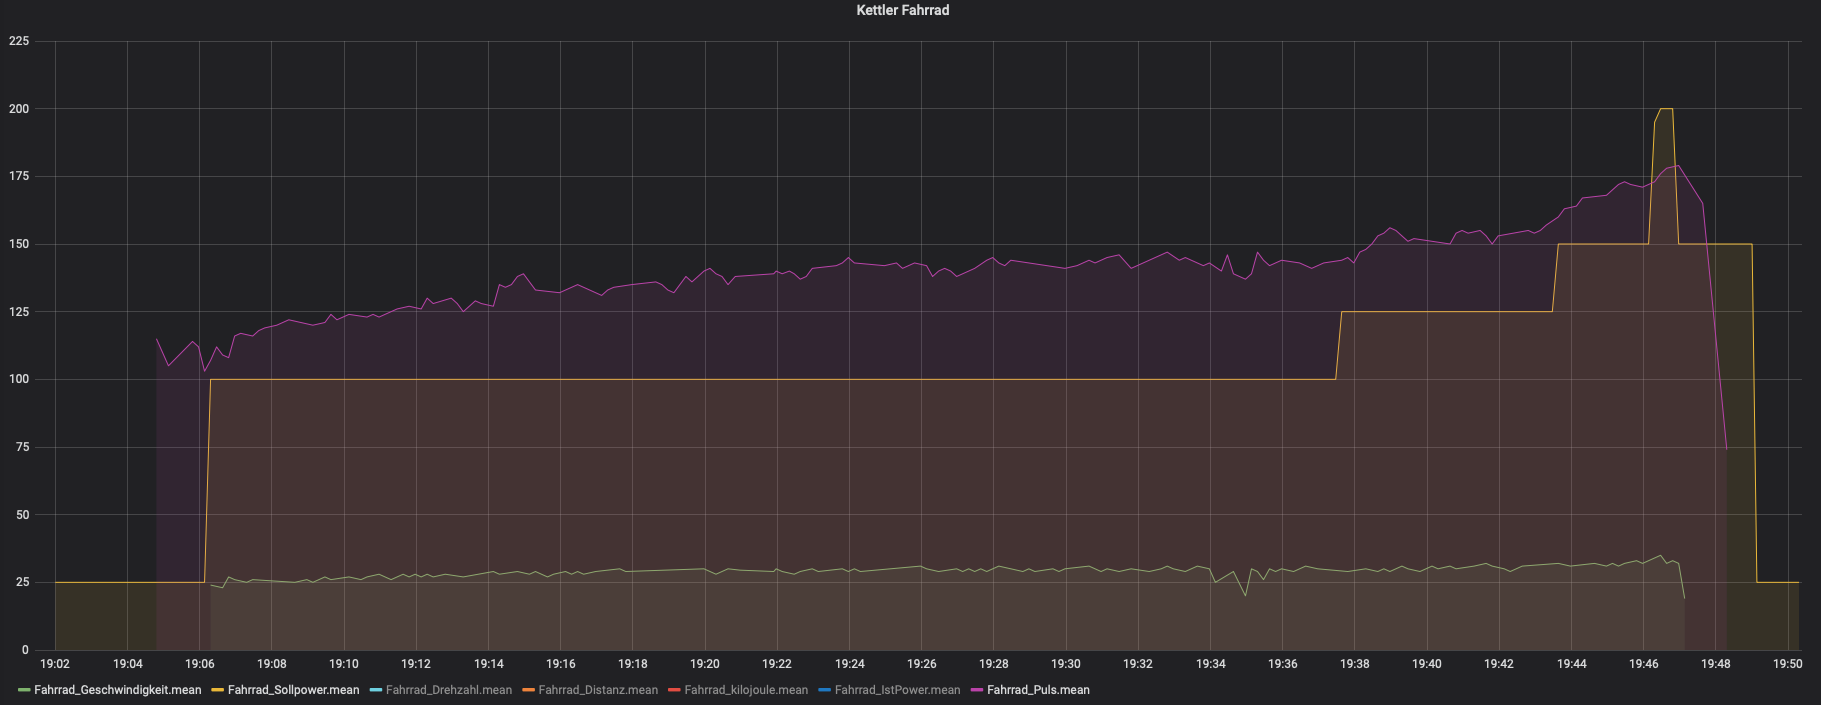 Violet: HR, Yellow: Targetpower, Green: Speed
Things I would do better
In the process I accidentally switched VIN and GND which fried the USB Chip on the Nodemcu. After desoldering the chip, it was working again, but I am not able to easily do code changes. So in the future, I will use something like ArduinoOTA to make the ESP programmable via Wi-Fi. Makes changes easier :)
Also, the conversion of the Values from Serial could be handled better.