3d printing a gps track
I was on a roadtrip through Norway this summer with a friend, and we did a couple of hikes. About a year ago I tried 3Dprint the GPS tracks with a tutorial from Instructables which was kinda successful but complicated. I never used Blender before, so it was totally new to me. Unfortunately, Blender changed a couple of things in their UI and functions which made it a bit hard to follow. In the following, I will document my steps with the current Blender Version (2.93.5 for Mac) and Meshmixer.
Blender Setup
You need to install the OSM Plugin. The free version is enough. In the Plugin settings, you need to specify a Terrain file directory. This is just for saving the downloaded OSM data. You also need to activate the “Mesh: 3D-Print Toolbox”. Create a new “General” project and throw away the standard cube, light and camera.
Importing the Terrain and Track
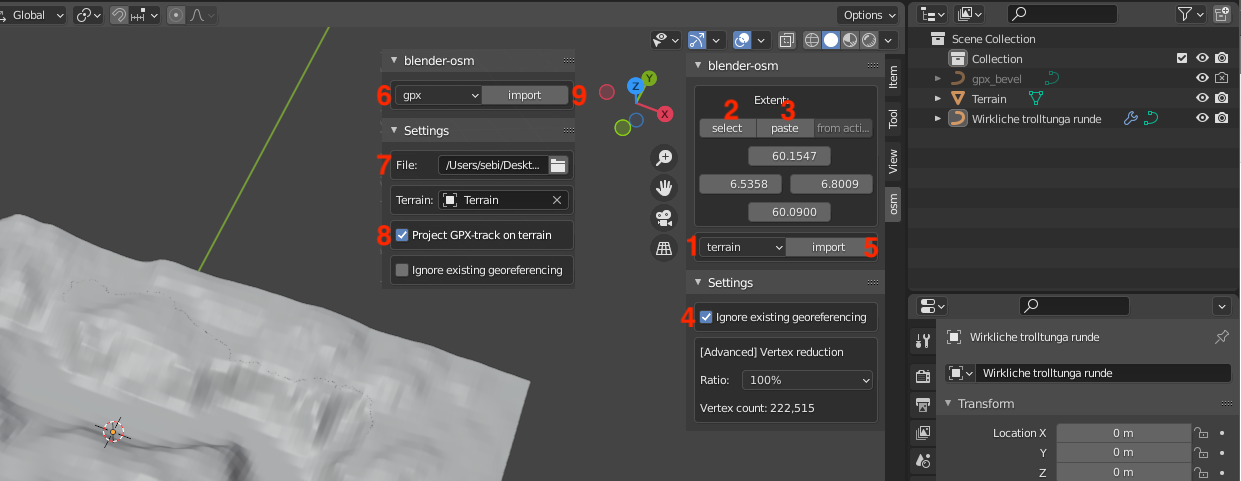 To find the OSM Plugin in the UI, there is a small arrow which hides the menu. In the “OSM” Tab choose terrain[1] in the Dropdown and then hit the select[2] button which will open a Browser window to select the area of the map that your track is in. Choose it bigger than your actual track. Then paste[3] it into the UI and tick the box “ignore existing georeferencing”[4]. After that, you can hit import[5]. Depending on the size, you might not be able to see it, because it’s bigger than the workspace. We will shrink it later.
Now choose GPX[6] in the dropdown and navigate to your GPX track[7]. Tick the box “project GPX-Track on terrain”[8] but do not “Ignore existing georeferencing”! Now, you can also hit import[9].
To find the OSM Plugin in the UI, there is a small arrow which hides the menu. In the “OSM” Tab choose terrain[1] in the Dropdown and then hit the select[2] button which will open a Browser window to select the area of the map that your track is in. Choose it bigger than your actual track. Then paste[3] it into the UI and tick the box “ignore existing georeferencing”[4]. After that, you can hit import[5]. Depending on the size, you might not be able to see it, because it’s bigger than the workspace. We will shrink it later.
Now choose GPX[6] in the dropdown and navigate to your GPX track[7]. Tick the box “project GPX-Track on terrain”[8] but do not “Ignore existing georeferencing”! Now, you can also hit import[9].
Scaling down and make it workable
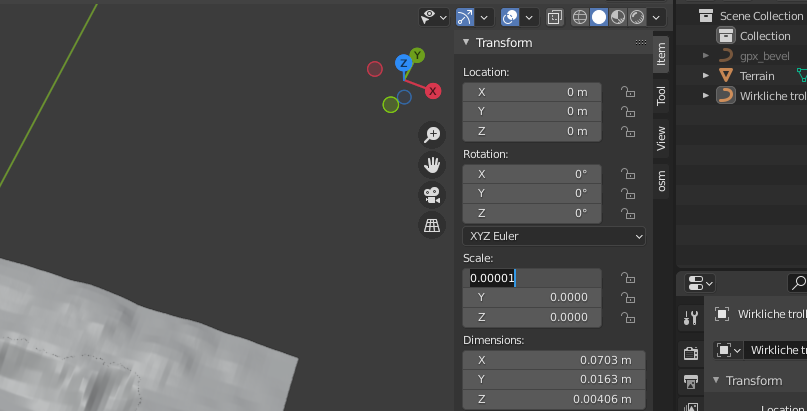 To make it smaller, choose the terrain, and start to reduce the size with the scale in the “Item” menu. A good starting point is 0.005, but depending on the size it may be much smaller until it’s almost fitting your printer. If you want, you can exaggerate the height to make it more extreme. It is important to scale X and Y direction the same to keep everything in place. Note your scaling factor somewhere and apply it also to the track.
Choosing the final Area 30SetCube
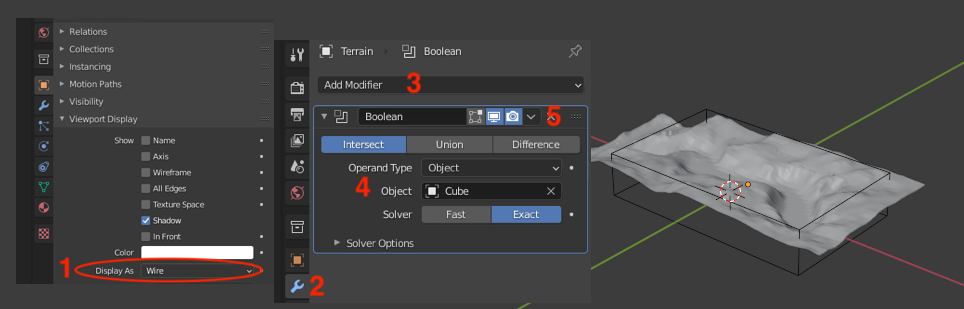 Add a cube to act as the cutout (Add → Mesh → Cube) and then scale and move it to fit the exact area you want to print. To make it easier to move around, adjust the “Viewport Display”[1] to only show the wireframe of the Cube. When the position and the size of the cube fits, click on the wrench[2] of the Terrain, “Add Boolean modifier”[3]. Use the intersect tool and as object, use the Cube[4]. This should present you a cutout of the terrain with a solid bottom. If everything is fine, hit Apply[5]. Now we have already a terrain model which would be printable.
Create track
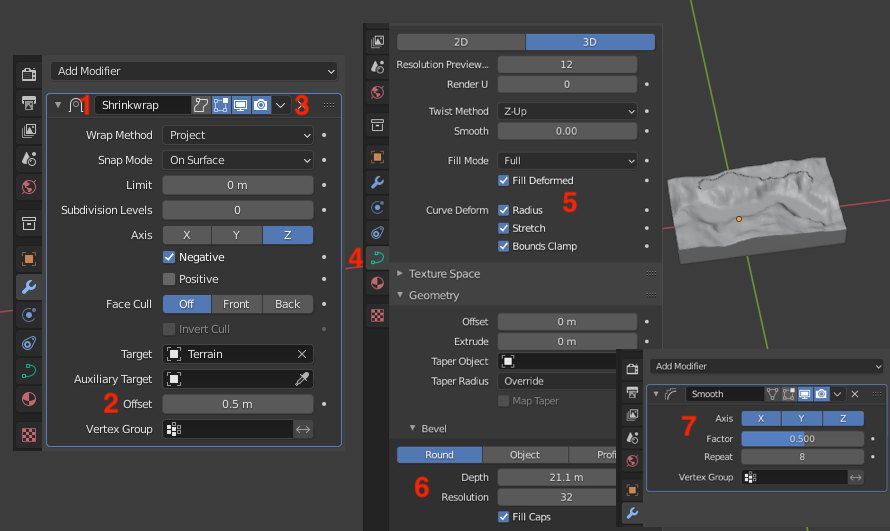 To create the track, choose the track curve and in the Wrench menu it automatically has the shrinkwrapmodifier activated[1]. This will put the track onto the surface of the terrain. As a standard it has a distance of 0.5 m which we will set to 0[2] then hit apply[3]. The next step is making it solid.
In the “Object Data Properties”[4] we have to set a couple of things.
To create the track, choose the track curve and in the Wrench menu it automatically has the shrinkwrapmodifier activated[1]. This will put the track onto the surface of the terrain. As a standard it has a distance of 0.5 m which we will set to 0[2] then hit apply[3]. The next step is making it solid.
In the “Object Data Properties”[4] we have to set a couple of things.
- Shape[5]: Fillmode “Full” with “Fill Deformed” and everything checked at “Curve Deform”
- Geometry: To make it really solid
- Extrude makes the Track higher in the Z direction.
- Bevel[6] choose Round
- Depth defines the size of the track. Increase until large enough
- Resolution: 32 (looks the best in my opinion)
- Make sure the “fill Caps” is ticked. Otherwise, it will be hard to get a nice solid track later!
If your track is looking good, you need to convert the track into a mesh. To do this, go to Object → Convert → Mesh. To reduce hard corners and make the track more round, I Go into the Wrench menu and add a “Smooth” Modifier[7]. Mostly, something like “Repeat: 8” looked nice.
Meshmixing
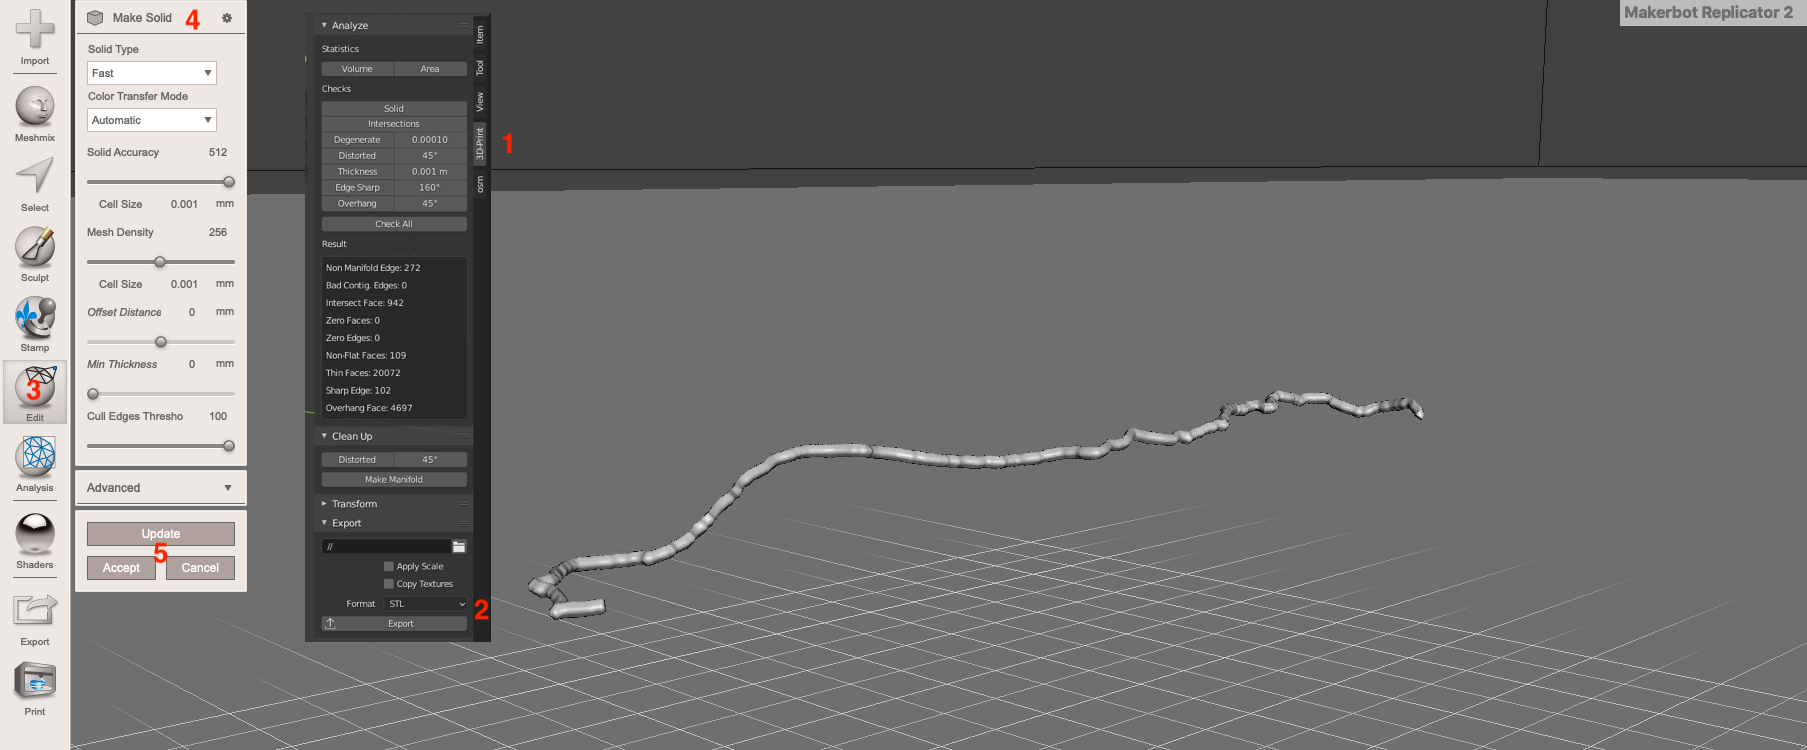 In the 3D print Menu[1] we can now export it as STL[2] to make really solid in Meshmixer.
Load your exported track.stl into Meshmixer. It should already look quite okay, but to be sure we will use the Make Solid Tool in the edit Menu[3]. I Basically turned “Solid Accuracy” and “Cull Edges Threshold” to max and “Mesh density” to sth. in the middle. Hit Update, accept[5] and then export the new solid STL.
In the 3D print Menu[1] we can now export it as STL[2] to make really solid in Meshmixer.
Load your exported track.stl into Meshmixer. It should already look quite okay, but to be sure we will use the Make Solid Tool in the edit Menu[3]. I Basically turned “Solid Accuracy” and “Cull Edges Threshold” to max and “Mesh density” to sth. in the middle. Hit Update, accept[5] and then export the new solid STL.
Cuting track into terrain surface
 Back in Blender, reimport the solidified Meshmixer STL. It should be in the exact same place as before.
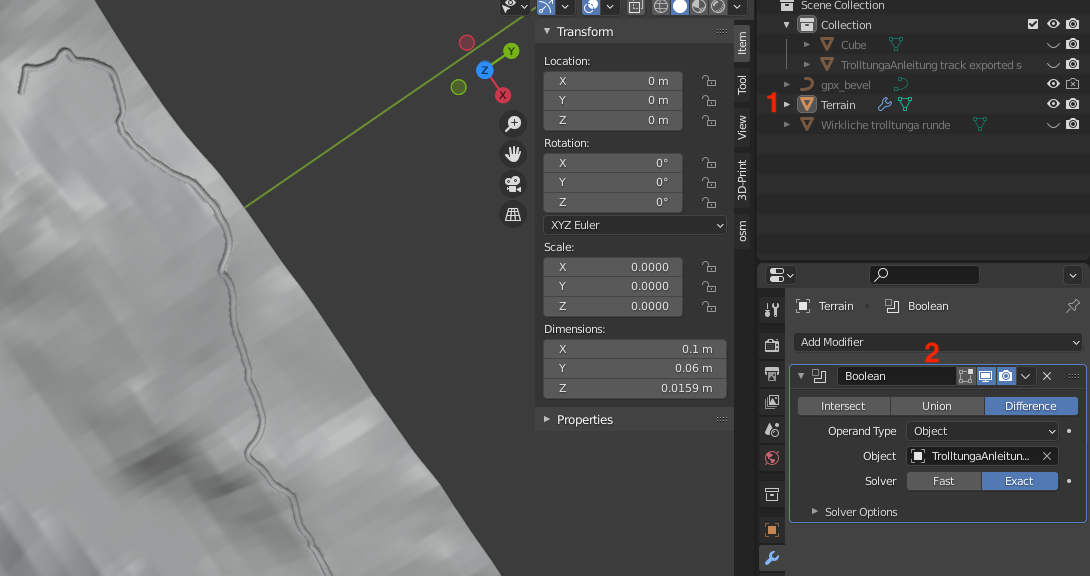
Now choose the terrain model[1] and add a Boolean modifier[2]. Choose difference and then as Object your reimported Solid track. If you Hide the Solid STL in the view, you should see a nice carve in the surface of the terrain model. If everything looks good, hit apply. You could now export the Terrain as STL, and it would be ready to print.
Back in Blender, reimport the solidified Meshmixer STL. It should be in the exact same place as before.
Now choose the terrain model[1] and add a Boolean modifier[2]. Choose difference and then as Object your reimported Solid track. If you Hide the Solid STL in the view, you should see a nice carve in the surface of the terrain model. If everything looks good, hit apply. You could now export the Terrain as STL, and it would be ready to print.
Add some text
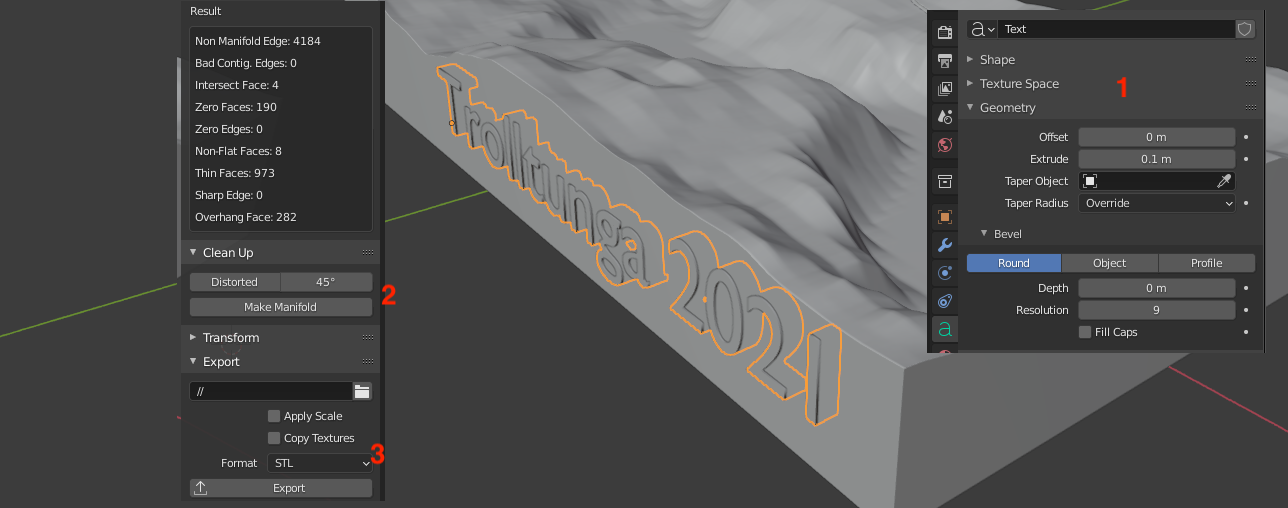 To make it easier to remember the Hike, I added some informational text on the side. To do this, Add → Text. Press Tab to edit the Text, and Tab again to finish editing the text. To make it solid is similar to the track. Go to “Object Data Properties” and in the “geometry” part define the thickness with the Extrude Value[1]. Use the “Item” menu to scale it down and move it to the right position. Make sure it penetrates the model just a bit.
Now you have two options. You can either just print it as an “imprint” on the outer body, or you could also export the letters as STL to print it in color.
Imprint:
Convert your text to mesh. Scale it to just make a slight dent into the outer surface. Choose the terrain and add a boolean modifier Difference with the object text. Then hit apply. You can now export the Terrain as STL and print it together with the colored track
Colored Text:
Convert your text to mesh. Scale it to be a bit thicker inside and being almost flush with the outer surface. Choose the terrain and add a boolean modifier Difference with the object text. Then hit apply. Export the Text and the terrain as STL[3]. You might need to make the text manifold[2] before exporting (3D-Print menu → Cleanup → Make Manifold).
To make it easier to remember the Hike, I added some informational text on the side. To do this, Add → Text. Press Tab to edit the Text, and Tab again to finish editing the text. To make it solid is similar to the track. Go to “Object Data Properties” and in the “geometry” part define the thickness with the Extrude Value[1]. Use the “Item” menu to scale it down and move it to the right position. Make sure it penetrates the model just a bit.
Now you have two options. You can either just print it as an “imprint” on the outer body, or you could also export the letters as STL to print it in color.
Imprint:
Convert your text to mesh. Scale it to just make a slight dent into the outer surface. Choose the terrain and add a boolean modifier Difference with the object text. Then hit apply. You can now export the Terrain as STL and print it together with the colored track
Colored Text:
Convert your text to mesh. Scale it to be a bit thicker inside and being almost flush with the outer surface. Choose the terrain and add a boolean modifier Difference with the object text. Then hit apply. Export the Text and the terrain as STL[3]. You might need to make the text manifold[2] before exporting (3D-Print menu → Cleanup → Make Manifold).
Final Results
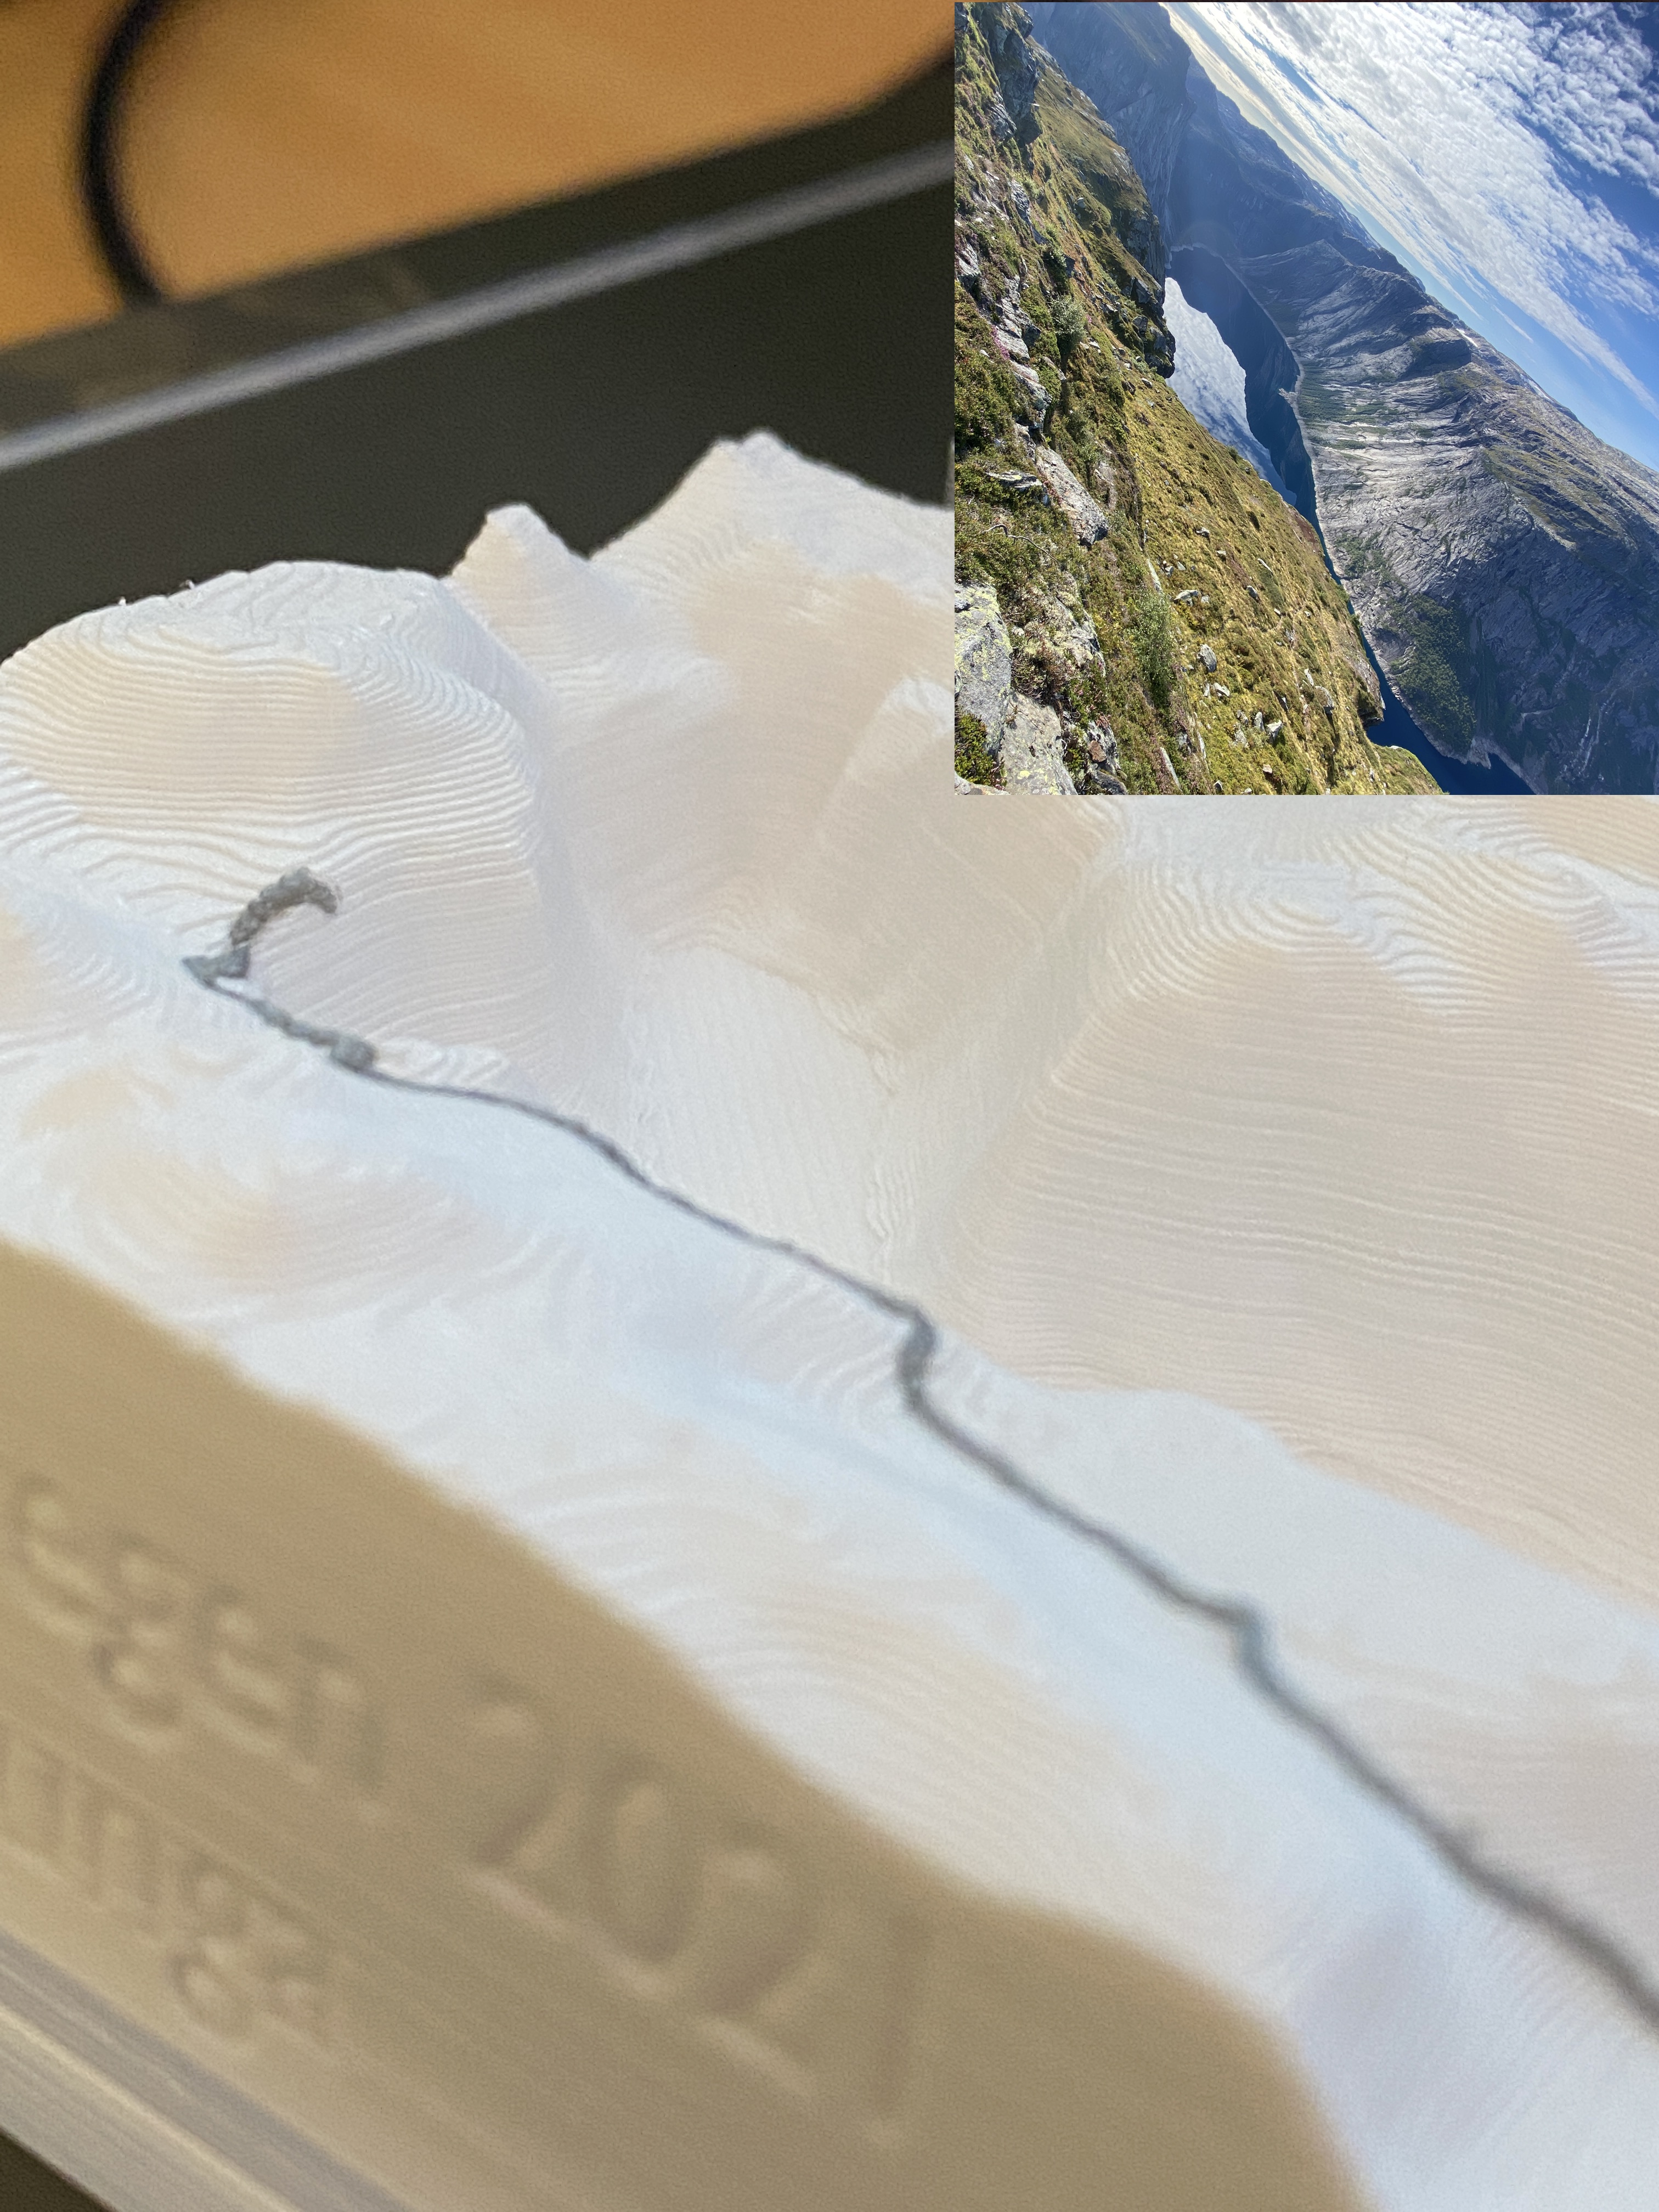
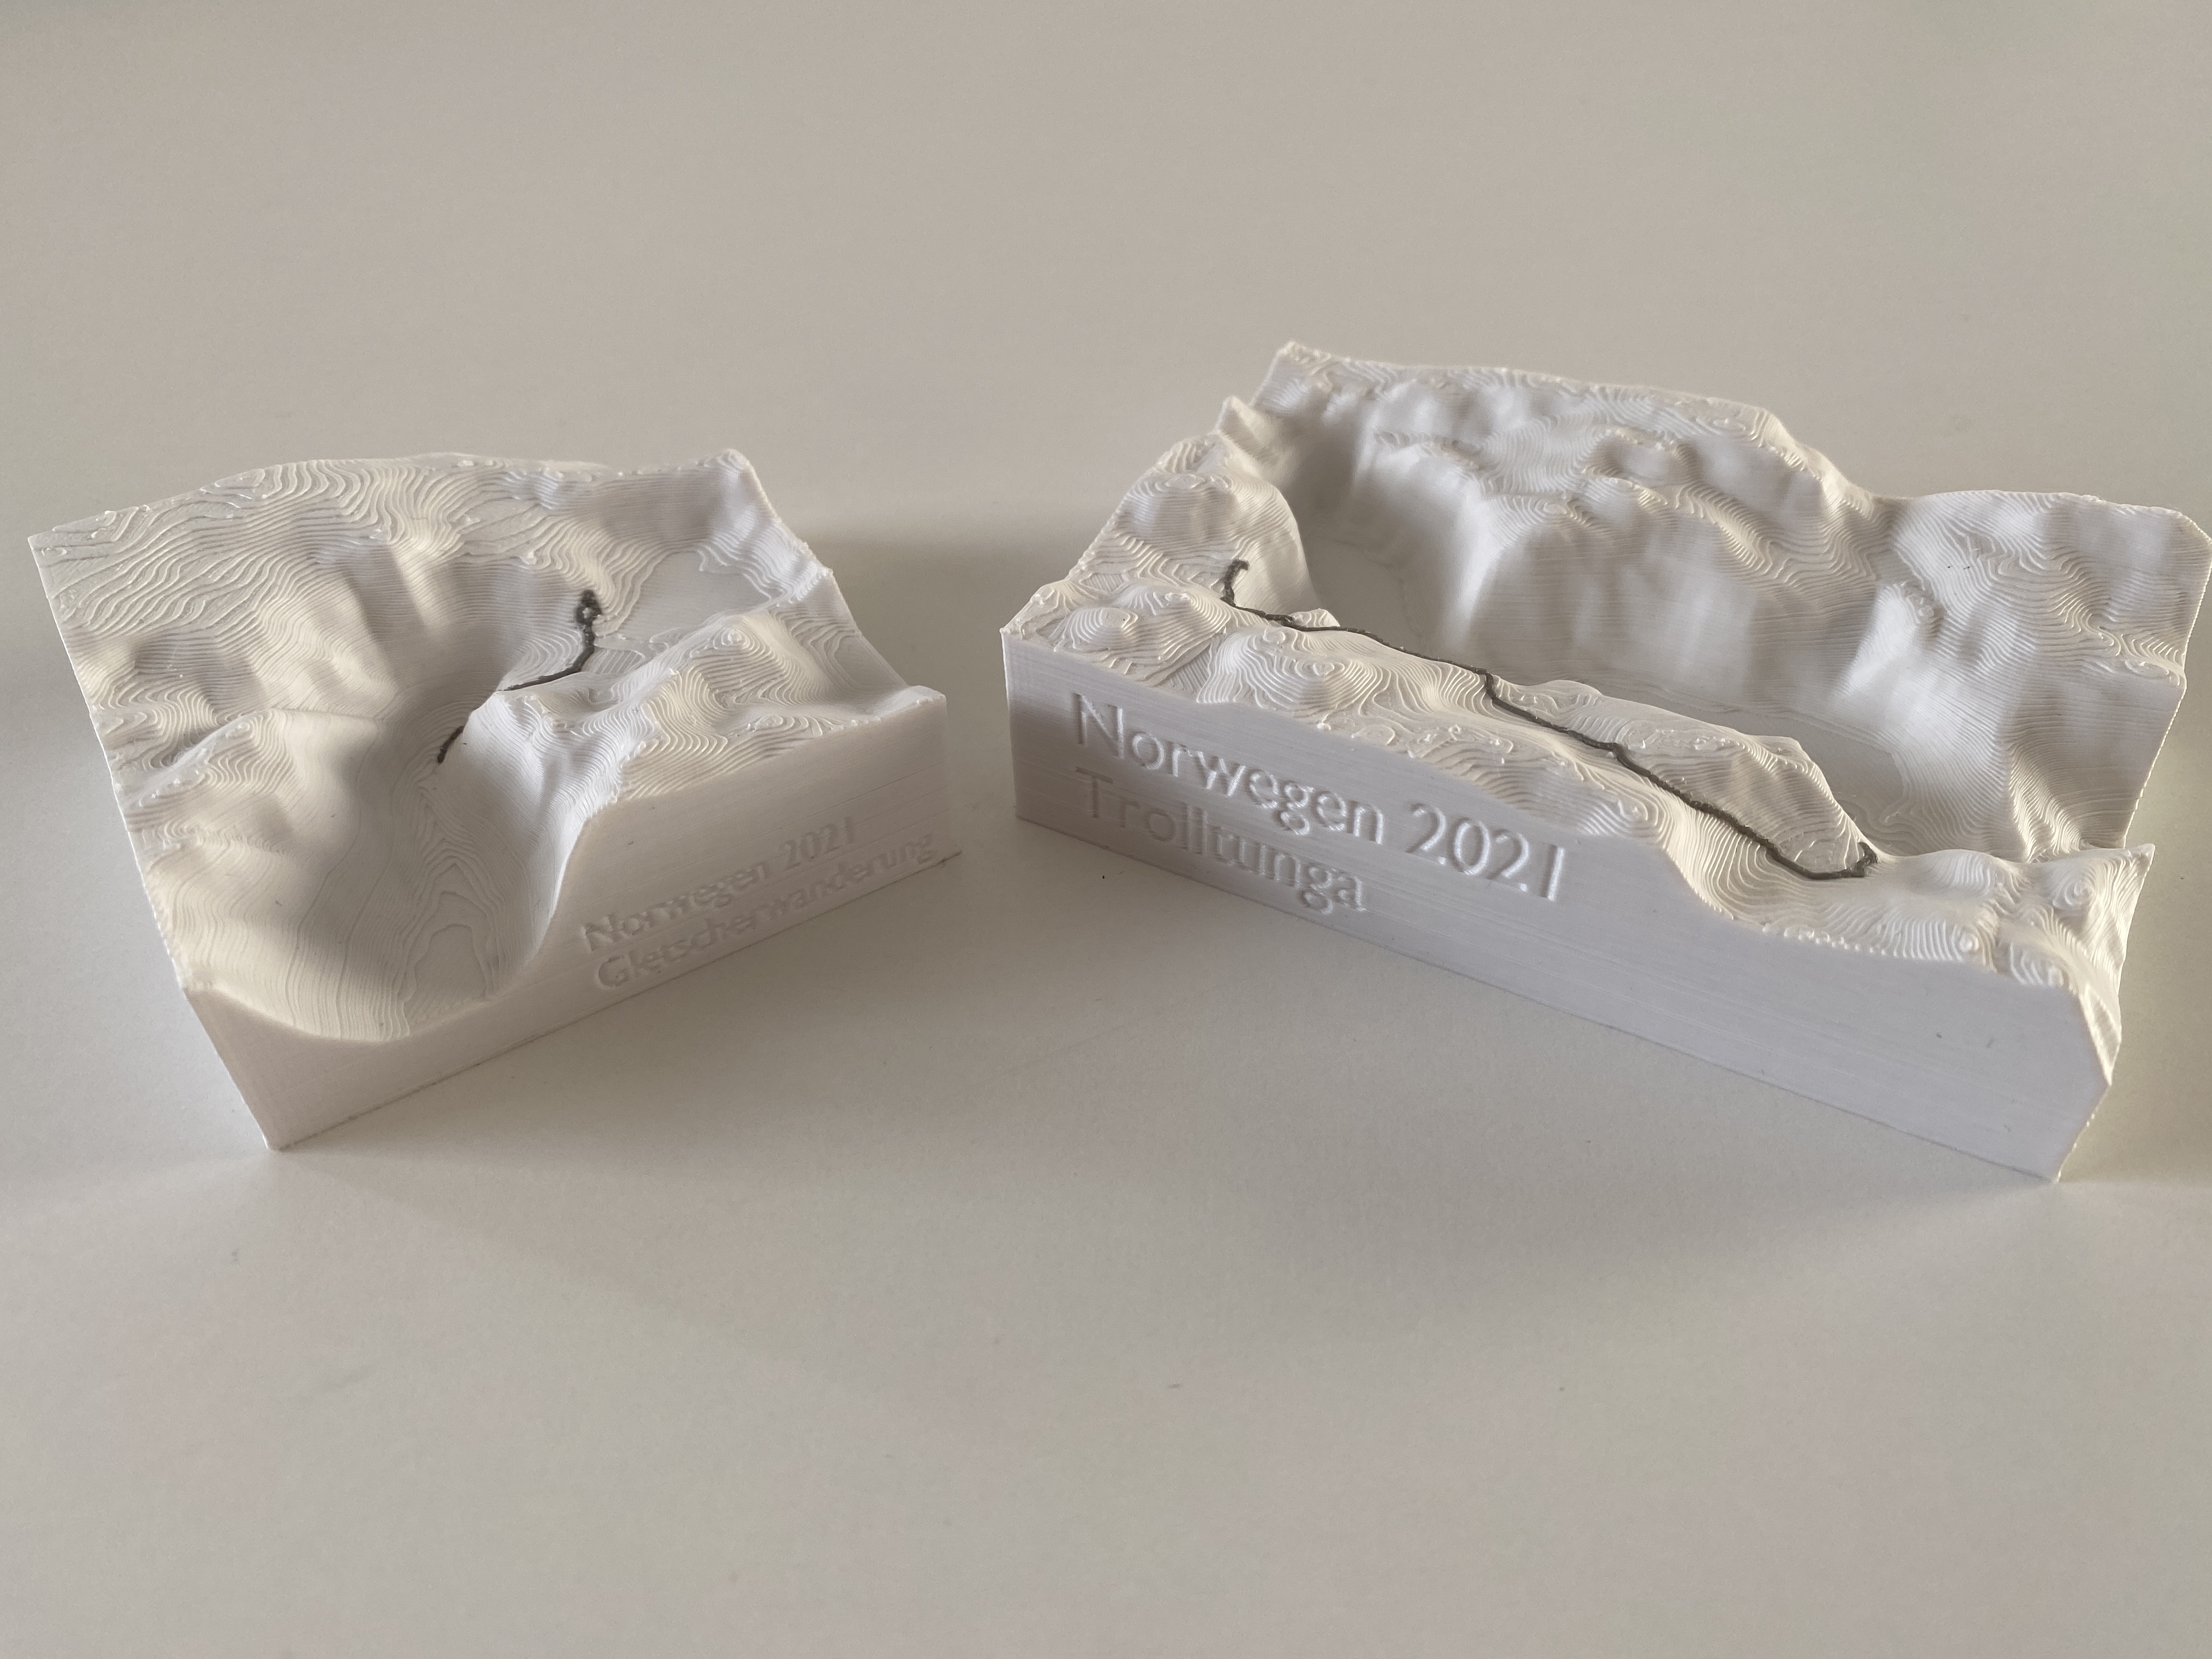
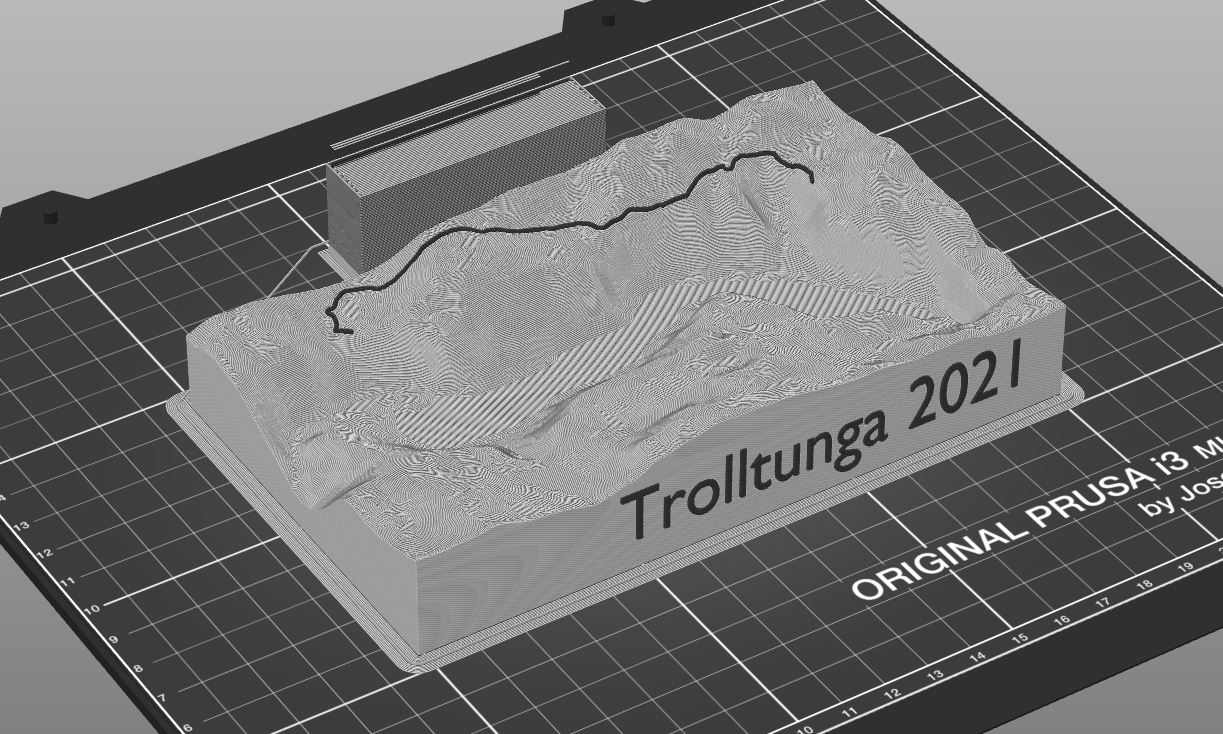
I am Very pleased with the look of the parts. I used my DAS FILAMENT PLA for the print in white and gray. Both models were printed on one plate in about 7 hours. I used the 0.2 mm Speed print setting with 20% Infill and 3 Perimeter lines and Brim just to be sure. I haven’t tested the printed text, but it looks very good in the slicer
Thoughts and Future steps
If you have no Multimaterial capabilities, you could maybe also just print it with just the grove and color it in later with a pen or acrylic paint. With the Blender OSM Plugin it is also possible to get more information like streets, lakes, rivers, buildings, forests and other stuff. It would be nice to see water areas on the print and also Streets or buildings. Maybe sth like my hometown or sth like that as a model would look very nice with all the houses and streets.